Being Frugal Part 1 – Coupons
 I have always been a deal-finder, clearance-rack, bargain-hunting shopper. It’s in my blood. Lately I seem to hear the words frugal, budget, and bargains more often than not. It’s the economy and people realizing that they need to take a step back and really analyse their finances, and I think that’s awesome. It makes being frugal more accepted.
I grew up with a mom who had a coupon for everything. “Hey, Mom? I wanted to try this new shampoo, can I throw it in the cart?” Mom: “Well it just so happens I have a dollar off coupon, sure throw it in.” Seriously, she had a coupon for EVERYTHING! My sister and I used to get so excited to see the total on the cash register screen, and then have it drop by 20 to as much as 60, 70, 80 bucks and be amazed at what my mom ended up paying. It was a game for her, and she was good at it…still is.
When I became a wife and had a household of my own to keep, I decided to get into couponing. It’s not easy, but it’s not hard either. I just takes a little bit of know-how and some clipping time and you’ll be on your way to saving hundreds in no time.
Here are my suggestions for someone just starting out:
1. Coupons are found in the Sunday newspapers, and sometimes are delivered to your mailbox. There are several different coupon circulurs, but the most common are RedPlum, SmartSource, P&G, and sometimes a General Mills insert. You can also find them online. Try coupons.com.
2. You can make it easy on yourself by having a Sunday newspaper subscription. What I have found is that my local Dollar Tree carries the Sunday paper for 1 dollar!
3. Buy more than one paper. You will really find that you are able to save more when you have multiple coupons. It doesn’t seem worth it to cut and clip to save 25 cents on a can of beans – but it you have 4-5 of those 25 cent coupons and combine it with a sale, you can save lots.
4. Come up with a way to get organized. I have a coupon file that fits in my purse. I got it in the Target Dollar section a couple of years ago, but any sort of small file system will work. Label the sections – toiletries, paper goods, canned food, frozen, etc…then when it comes time to clip – you have a place to put the coupons and it’s quick.
5. Check out couponmom.com. She’s got local store deals and tells you what coupons to stack, and it’s free. There are also a couple of websites where you pay a subscription fee. Your biggest savings will come when you stack a store coupon or sale with a manufacturers coupon. Most drug stores also have rebate coupons that you can put towards your next purchase. For instance, today I went to Walgreens and bought a Gillette Fusion razor and Fusion shave gel. The razor was originally 12.99 and the get was 4.29. The razor was on sale for 8.99 and there was an in ad coupon for the gel for 1.99. I had a manufacturers coupon for $4 off the razor and $1 off the gel. I also had a $6 register rewards good towards my next purchase. My total was .99 before tax! It really does pay to do a little bit of research before you buy!
Overall, if you’re interested in getting your grocery bill down and being able to purchase things you don’t think you can afford, give couponing a try!
Leave me a comment if you have any specific questions about couponing or a personal success story! I’d love to hear from you!

Western Washington Giveaway and Awesome Sale!

For all those who are Western Washington readers, there is a very cool sale coming up next weekend. The company is Sassy Mei and they are a traveling chic boutique with everything you could want for baby, kids, and even mommy! I’m so excited to go check it out next weekend…hopefully my daughter can endure the 30 minute drive to Issaquah and back! Check out the website for vendors, times and directions. You won’t want to miss it!
Also, Thrifty NW Mom is hosting a giveaway for a fabulous pair of Lindsay Phillips Ballet Flats. These are so cool, and will look good with anything! They also have interchangeable snap-ons that you can purchase to change up the look. These are a $69 value, so enter!

Oh, and if you’re looking for great local deals, subscribe to Thrifty NW Mom! I can’t tell you how many great deals I’ve learned about through her great blog.
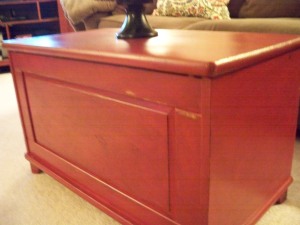
Before and After – Coffe Table Chest
Christmas this year was a little different now that we have a baby. So many presents! Crazy. Since we live in an 860 sq. ft. condo, space is always an issue. I’m trying to be very good about rethinking what I bring in, and always having a box to put things in to donate. I’m trying to live more simply. Having a kid makes living simply, well, really difficult!
She acquired a load of toys, and all I was thinking was “Where in the heck are we going to put these?” “Oh no, our living room is going to look like a Gymboree!”
So the search began for a storage chest that could double as a coffee table. There are lots of options out there, but I couldn’t handle the ridiculous price tags. 80 bucks for a wicker chest at Target? Come on people.
Finally I found this beauty on Craigslist. Got it for 40 bucks after waiting about a week for the lazy seller to meet up with my husband. Don’t you hate the wait that is Craigslist? AHH!
 Here’s the before picture. Obviously, I was so excited to take this picture I forgot to take the pic at the beginning 🙂
I decided to paint it a dark red, distress it oh so slightly, and then put an antiquing glaze on top. I wanted it to resemble something you would pick up at Pottery Barn, but for way cheaper!
So I put about 2-3 coats of the red and let it dry completely. Then I took sand paper and sanded the edges. Some chunks of paint came off here and there, and that was ok with me. I wanted it to look worn – like it had happened over time.
After distressing it, I applied the antiquing glaze. This was my first try with the stuff, and I have to say I’m pretty pleased with the way it turned out. I just used an old soft cloth, and applied it in a circular motion. It really gives it a deep, rich tone – and makes mutes everything. I love it! Oh and I bought it at Lowes. It’s the Valspar Antiquing Glaze and it was around 7 bucks…I have almost the whole bottle left too. You don’t use that much.
What do you think? I’m really happy with it! The night I finished it, I went to bed thinking of all the other things I could glaze…my husband might just need to hide the bottle from me!
Tidy Mom Valentine Recipe and Giveaway!

How do you all feel about Valentine’s Day? I’ve never been much of a fan…but there are so many cool decor projects and recipes out there in blogland! Have you seen this awesome felt heart wreath from the Idea Room? Or this why I love you pillow from How Does She?
I’ve had to restrain myself from making our condo cluttered with pink and red. I think once my daughter is a little older, I’ll start decorating for Valentine’s Day.
Whether you decorate or celebrate or don’t do anything at all, this recipe needs to go on your to-make list. I can’t wait to try it out for our Valentine’s dinner celebration. My husband loves cherry anything, so I think it’s going to be a winner. Plus we’ve both been trying to eat healthy…so a little indulgence is going to taste so good!
Hop on over to Tidy Mom for the recipe and a sweet giveaway!
Soap Nuts Giveaway!

Remember my recent post on soap nuts, and how cool they are? Well, here is a great opportunity to try them out for free! Enter this giveaway, and cross your fingers!
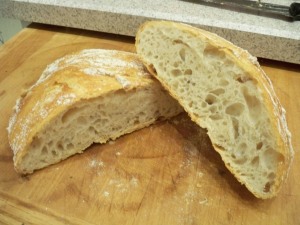
No Knead Bread
 This is one of my favorite recipes! Seriously, you can make bakery style, 4-dollars-a-loaf, bread in your own kitchen. If I can do it, you can do it. I’ve used it for sandwiches, and for a side with soup (perfect for dunking) and my husband just pulls a chunk off and dips it in olive oil and balsamic vinegar. It’s amazingly good.
You will need:
Flour
Yeast
Water
Dutch Oven or Heavy Bottom Soup Pot
That’s it! Find the rest of the instructions here.
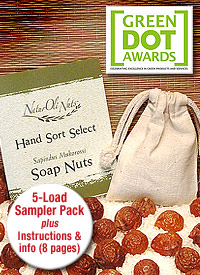
Soap Nuts – All Natural Laundry Detergent!
 I first heard of soap nuts when I was looking for a laundry detergent suitable for washing cloth diapers. I needed something without fragrance and something that wouldn’t leave build up on the diapers, which, overtime, leaves cloth diapers unable to absorb moisture.
I took this description off of the NaturOli website, where I purchased my soap nuts. “Very simply, soap nuts are the dried shells (or husks) from the soapberry (or soap berry nut). These berries are the fruit from a quite unique tree species. These shells contain a substance called saponin that produces a soaping effect. Saponin is a 100% natural alternative to chemical laundry detergent and cleansers.”
I originally ordered a small sample, which got me about 4-5 loads of laundry. It was 2.25. The soap nuts came in the mail, and I used them to wash ALL of my soon-to-be-arriving baby girl’s clothes. That was a job! If you’re ever expecting a girl, just be prepared for lots of clothes…it’s son fun! These soap nuts were awesome! You throw 4-5 in the canvas bag that comes with the order, and that’s it! If you use cold water to wash, you’ll need to soak them in a glass of hot tap water for 2 minutes and they will be good to go. 1 canvas bag of 5 will last you 4-5 washes. I ordered a 68oz. bag and it is going to take me a very long time to go through it!
Because these are natural and have no added fragrance, your clothes will not smell what we think of as “clean.” They have no smell when coming out of the laundry! Weird I know. You can add a drop of essential oil if you wish. Also, the soap nuts have a bit of a vinegar smell, but your laundry won’t end up smelling like that.
So, if you’re looking for a great, low cost laundry detergent that is safe for baby, cloth diapers, and your family, give soap nuts a try!
Fuzzi Bunz Cloth Diaper Review and Cloth Diapering Tips
When I found out I was pregnant with our first child, I did a lot of research on how to have a baby without breaking the bank. We didn’t go crazy and buy every thing the baby registry checklist told us we needed. I wanted our daughter to have what she needed, but didn’t want to have our small condo filled with expensive baby gear, that probably wouldn’t get used enough.
I started considering cloth diapers, first of all. I didn’t realize how far cloth diapers had come! Moms are no longer limited to those white diapers that have to be held together with safety pins…which SCARE me! Cloth diapers have come SO FAR!
I finally decided that pocket diapers would be the way to go for our family. There is an outerlayer (the diaper) that has a waterproof fabric on the outside, and a soft fleece on the inside. You slide a liner into the “pocket” and that is what absorbs the moisture. These diapers snap shut with sewn in snaps. They come in all sizes, and more recently, one size fits all. Yes, there is a bigger up front cost, but you will save SO MUCH compared to disposables, trust me.
I ended up deciding to purchase Fuzzi Bunz. I ordered 24 small to start. They have been perfect. No diaper rash for our little girl! Check out the Fuzzi Bunz website for more information. I ordered mine from Ebay. They were brand new and significantly cheaper than some online stores. You can also find slightly used on craigslist or even resell them there when you are done with them!
Helpful tips for cloth diapering:
- Start out with 16-24 diapers. I have to do laundry about every 2-3 days with 24 diapers. It has definitely slowed down as my baby has gotten a little older. At the very beginning we used newborn disposable diapers just to make it easier on us.
- Get a diaper pail that works for you. I ended up ordering the Fuzzi Bunz In and Out Mess Free Diaper Bag . I have it hung on the back of the nursery door, and it’s so easy to just open it up, shake out the liner and throw the diaper in. When you’re ready to wash, just unzip the bottom of the bag and all the diapers fall out into the washing machine. You don’t have to touch anything! Throw the bag in at the same time too!
- Get a small zipper wet bag. These are for when you are out and about and need a place to put the soiled diaper. I bought a Planet Wise Wet Bag in size small. I think it was around 9 bucks. I can stuff 3 diapers inside…more than enough for on the go.
- Washing instructions: While baby is still breastfed or bottle fed, #2 does not need to be rinsed or shaken off before washing. Once it becomes more solid, the contents need to be shaken off into the toilet before washing. 1. Run a cold water rinse. 2. Run a hot water wash. 3. Dry everything, diapers, liners, bags in the dryer.
- Use a fragrance free detergent. I use soap nuts (stay tuned for review on these miracle babies) and a scoop of Oxy Clean Baby. I haven’t had any stains remain on the diapers and they always smell fresh and clean!
If you have any additional questions about cloth diapering, please leave a comment and I will respond!
 Pottery Barn


